Tuesday 19 March 2013

Star wars X-Wing and Space Combat Space Terrain On Sale

We've now got our first product (of many to come) one sale! We've been working on refining our space combat asteroids and they are now in a great way. After several different ideas about how we were going to make the bases (these included using all sorts of casting, from plaster, to latex to plastic and wood) we finally decided on laser cutting.

This gives us a clean, crisp edge on our bases, as well as a uniform product that is exact. As the asteroids are designed to be compatible with X-Wing*, we wanted them to work for tournaments and competetive games as well as casual play, so keeping them all the same was important. The 3D asteroids on top of the bases are all unique, but they can be because they are representative but in the rules of the game it's the bases that are important.

A base with a test asteroid
 
Close up on the base

An Asteroid field! (we don't suggest people play with this many,
but it looks cool :)

We now have the pack ready and raring to go - you can by them from ebay now.


The final result a pack of space combat asteroids!

We're selling them in packs of 6; 1 large, 3 medium and 2 small, and they are all on 80mm bases so that X-Wing small fighters will fit underneith without having to move the asteroid on top*. As far as we can see these are the only set available at the moment (and even if not, we still think they are the best - no bias!), and we've priced them conservatively so that they can cost effectively improve anyone's space combat terrain.

The next project we're looking at is templates for movement and shooting for X-Wing, and we'll be posting info on this very soon so look out for more info!

If you're interested in this or any other products, or if there's anything you'd like to see on the battlefield, let us know. We're constantly looking to expand our product list, and would love to here from you.

Our 3D Asteroids are £16, with £1.50 p&p in the UK - check them out here.
More soon,
H/F


*Hammer and Forge and thier products are not endorsed by, affiliated with or sanctioned by Fantasy Flight, Disney or Luscas Arts.


Sunday 24 February 2013

Gladius swords and rocks from space


With the New Year well underway it's time for more info about what we've been up to while hibernating over Christmas. 

We've go big plans for 2013, starting with a line of accessories for table-top games while expanding our replicas and reproductions. To start off we are looking at 3D asteroids for space combat games. 

Plastics are a relatively new medium for us, as we tend to work in metal and wood. Still, they have a finish that is second to none, and in terms of gaming accessories are perfect for table-top use. So we came up with the idea of floating asteroids. Starting with the space rocks themselves, we carved them from high density polystyrene.

Starting block of polystyrene.
Adjustable band sawing the large block into
square, asteroid friendly chunks
Ready to be shaped
Finally in asteroid shape

 Once we have an approximate shape we can finish them with the right colouring. The white layer adds strength to them, giving them a hard shell so that they can take knocks and wear and tear, then the black starts the finished look.


Undercoated and ready.

Spraying black as a base for the final coat.

Lastly we paint them dark grey and highlight them in lighter grey, and there you have it - asteroids all ready to go (more pictures and how we do the bases soon).

We also had an enquiry about swords for stage shows and props. The brief was 'as long as they look like roman swords, and are cheap', so we did some research.
Gladius (picture courtesy of http://www.legioxv.org/)


We found the Roman Gladius, and the designer was pleased with this, so we then had to work out how to make two of these, very cheaply, which would still look good on stage (and also be safe to use!). We got right on it, as you can see.

We started looking at how we would attach the handles to the blades, and came up with welding split pins to them and drilling into the hafts.

Taken with the flash so that the burning rods can be seen.
These are the joins from the blade to the rod which
sits inside the haft

By using the same material as the blades, we got the right joint
size before welding.
The cut blades ready for action, with ground edges and
blunted tips

We made sure we tested the edges and tips several times
to make sure they we completely safe.
In the above picture they were still too pointed, so it was
out with the grinder again.
Post-welding together, the blades and the haft-rods.

Ready to be assembled with the
undercoated hafts.
Trying the hafts on for size.

The final result, ready for the stage. Not as
intricate as would be necessary for a
wall or historical re-enactment, however
perfect for a few chose moments on stage.


The results are clearly visible gladius swords, with theatrical edges (rounded off and blunted), for a low cost and only taking two days to make. The designer was very happy, and we will be selling them off after the production.

To see the production of Cymbeline, go to the Drayton Theatre website  to book tickets,
and for more info on commissioning us for props and replicas visit our facebook page or email us.

Friday 18 January 2013

Designing and building slows down....

We're currently in the midst of re-energising the company with the new year, we've got design work all over the place and more intricate trophies and wax seals to come (keep and eye out for more infor soon), but in london there are some things that you just have to stop and do, like making a snowman equiped with our seal of approval.

Snowman seal of approval
H/F

Wednesday 28 November 2012

Project Finished: Particle Magnum

We spent a great deal of time on this project, mainly because we wanted to get it right but also because there was a good amount of experimentation to see if we could improve on what we started with.
Paint testing
This is perhaps most obvious in the paint and finish we applied to the gun. We started off with the idea of having it be metallic, but when we tried a few colour tests they seemed far too shiny and garish for someone who's basically a space pirate / mercenary. This led to us looking into different ways of giving it a metallic colour but with a darker edge than most of the sprays we could find, so we looked into amending the colours.

We started by giving it a coat of sealing paint, and then sparying it a dull grey to give the shadows body and cover the white of the previous paint in case of any scratches or scars. Unhappy with the gun-metal greys on offer (either too metal and sharp or too grey and flat) we invested in a new airbrush and mixed up a paint of our own. It turned out to be about half a dark silver metallic paint, a third grey, and a sixth black.
Shiny new air brush
 

This gave us a good gun metal grey to work with, and after giving the whole thing a couple of coats it was looking pretty realistic.

After one spray round...

And then with a lighter finishing coat.


Given that the client wanted it in wood, the paint and coats of colour added to the smooth finish on the wood, giving a great effect. However, it's meant to belong to a pirate who's been around, so we stippled some lighter and more metallic scratches and grazes onto the corners, barrel and trigger guard as the most likely places to have seen wear and tear.

Having created a good finish on the main body of the gun, we went into the details that make it stand out. The front has three shining red hemispheres in place of a traditional gun barrel, which we moulded out of red clay and then applied a varnish to to give the plastic/sci-fi material look to. The chambers/ammo is a translucent energy, so we used a resin that dries slightly opaic and red, and then backed it with metallic foil; this means that from certain angles the light will make the resin shine and look like it's glowing as it reflects off the metal.
Pre-finishing the hemispheres in their basic state

We also had to wrap the handle with hemp-style cord, but couldn't find both a texture and colour that we liked. Thinking caps on again, we chose a cord with the right feel and texture and then mixed up a dye to colour it (while in the jar, no actual branston pickle was used in the colouring :) The ends were sealed to make sure that the wrapping wouldn't unravel and then attached to the handle.

No pickle was harmed in the colouring of this cord

Final Wrapping
Lastly we machined and added four metal studs as shown on the original design for the power, range etc. changers, which we then sanded down and oxidised slightly to reduce the shine and make them look more in keeping with the rest of the gun.


Above: the finished article.

We're now sorted on Ebay and Paypal, so will be Ebaying a series of items soon, starting with our seals. More info soon!
H/F

Monday 20 August 2012

Holiday work


We've been away / at the Edinburgh Fringe for a bit, but still working away.

First up on the menu are some victory seals for Woking War 2012, a Warhammer 40,000 Singles tournament coming up at the end of the month. Six seals were commissioned in all, 1st, 2nd and 3rd, as well as Best Painted, Most Sporting and Overall Winner.

One of the first 2,000 point tournaments to use the new edition of the rules, they wanted something to mark it out as special. Were also in talks to create a longer term attainment award (like the medal strip on highly decorated army officers) for people who have highly celebrated careers at a series of events.

First and Overall Winner seals

Second and Best Painted

Third and Best Sportsmen

All Bagged up and ready to go.


 For information about how to take part (and win one of these), check the post here.

Not neglecting our larger pieces, we've been working on a Sci-Fi Replica gun for a client. A long-ish time in the making because of finding the right material, look and workable finish, we're well on the way with it and it's looking (we think) pretty damned good. Let us know what you think...


Half carved and finished (minus shaping) gun barrles and flash suppressors on the front.

Core of the gun with start of the additions.

With under-barrel piece added and start of the mag.

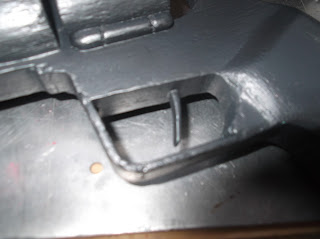
Trigger guard ready to attach.

Close up of the carved

More to come - hope to see people at the event this weekend - we'll be bringing the Chainsword for those who haven't seen it yet, as well as the seals for the winners.

H/F


Monday 16 July 2012

Art in Motion...helped by Hammer and Forge

From the previous work in progress pictures, we can now show the final product. Designed to look (and be partially) reclaimed and nautical, the installation was put up in Margate on Friday 13th, thankfully with no unlucky consequences apart from the weather the next day.

However the sun came out for the Sunday, and some great pictures were taken. Take a look...

Long shot of the piece at rest

And from the other side.
The artist, Caitlin Abbott, worked with us to design and build the piece, and also designed and painted the views that people looked through. The entire structure tilted down as people walked on it, so that they could have a new perspective on the harbour through the turner-esque plates she mounted in the viewports.
Tilted in the down position, allowing people to rest on the step and see with a new perspective.

Names and information on the artist, sponsor and Hammer and Forge!

While not our usual type of commission, it was an interesting challenge to make something as large as this with working parts out of specific materials, and we are very pleased with the results.

Thursday 5 July 2012

Sci-Fi magnum and Gauntlet templates

We're all go this week, hence another blog post so soon.
Along with our installation, we're continuing with our main replica work, specifically on a Sci-Fi Magnum and our gauntlets.

The Magnum is similar to Ronan's Gun from Stargate Atlantis for a LRPing client. Starting with a scale drawing (as usual) we've experimented with the best way to go about it - the client wants it in wood to save costs, though we'd gamed out for plastic/resin and metal just in case before having the design talk to finalise the idea.

After finding the right core wood, we've glued wood for shaping the edges and details to the core and will be routing out the big details before sanding down and carving the smaller details in. The end chamber for the revolver-style magazine will still be in resin to keep the slightly glowing look of the original.

Router at the ready

Core of the gun with gluing sides for details.

While we get the final pieces machined and detailed, we're looking long term. Previously we've been looking into middle ages gauntlets, and have pictures in previous posts with early designs. Well, we're much closer to a finished model now, with articulation and joints in the fingers.
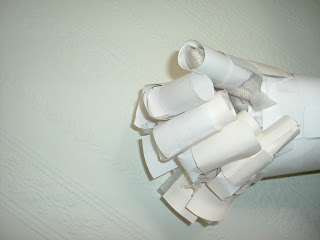
Basic joints

Fingers bent top view

Inside glove view

Closed fist/finger view

While basic, the articulation goes for each finger gives us an idea of how the metal will move and which bits we'll have to increase in size to fit different hand sizes. We'll probably make a third model of the exact size and shape so we can do a final test.

However, this model also allows us to have a basis for future gauntlets such as power gloves and gauntlets, some of which we already have interest for...more news soon.


ShareThis